
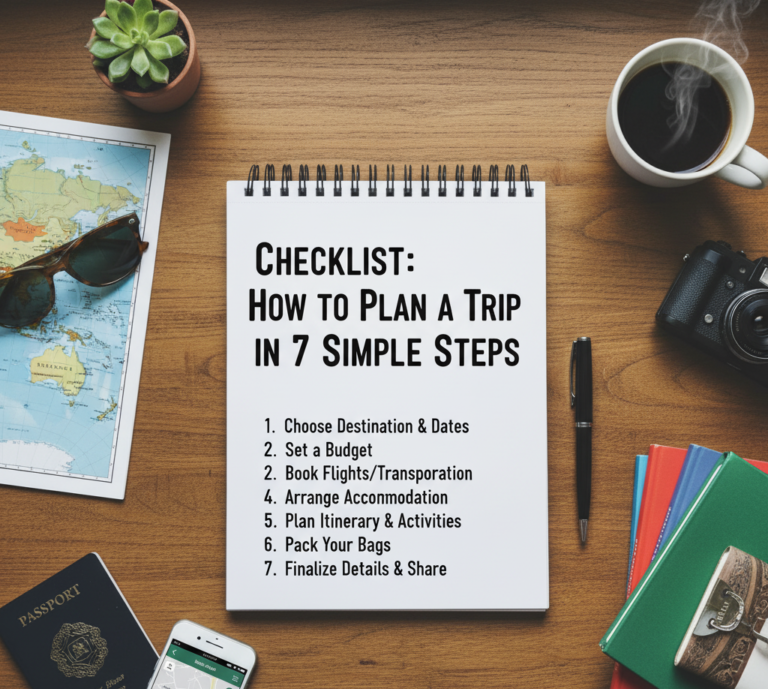
Checklist: How to Plan a Trip in 7 Simple Steps (Stress-Free Guide)
A great trip doesn’t start at the airport; it starts the moment you decide to go. However, the gap between “I want to travel” and “I am boarding the plane” is filled with hundreds of small decisions. Without a system, planning becomes overwhelming, leading to decision fatigue and procrastination.
Whether you are backpacking through Europe or seeking a luxury weekend getaway, the logistics remain the same. This 7-step checklist is your blueprint. It combines financial discipline, strategic booking, and smart packing into a seamless workflow, ensuring your only worry is which restaurant to try first.
Why Most People Plan Trips Poorly (And How This Guide Fixes That)
The single most common trip-planning failure mode is not incompetence—it is sequence. Most travelers approach planning in the wrong order: they get inspired by a destination, look up flights impulsively, try to reverse-engineer a budget after the fact, and end up either overspending or abandoning the trip entirely. The result is a cycle of excitement followed by overwhelm, which is precisely how travel dreams stay dreams.
The second failure mode is false completeness. Travelers who believe they have planned thoroughly often discover on arrival that entire categories of preparation were skipped: no local SIM card strategy, no offline maps, no awareness of local transportation, no understanding of entry requirements or visa rules for their specific passport. Each gap produces friction at exactly the moment you want to be free of it.
The seven-step system below solves both problems. It enforces the correct sequence—finances before destination, logistics before packing—and covers every category of preparation in a single pass. Work through it once and you will never arrive underprepared again.
How Far in Advance Should You Plan? The Timing Framework
One of the most common questions about trip planning is simply when to start. The answer varies significantly by trip type, destination popularity, and travel season—but following a general timeline eliminates guesswork and maximizes your access to the best prices and availability.
| Trip Type | Recommended Lead Time | Why |
|---|---|---|
| International long-haul (peak season) | 4–6 months | Flights and accommodation at peak price months out |
| International long-haul (shoulder/off-peak) | 2–4 months | More flexible; last-minute deals sometimes available |
| Europe city break (peak summer) | 3–5 months | Budget airlines release seats ~6 months ahead |
| Domestic weekend trip | 4–8 weeks | Drive or short-haul flight; accommodation flexible |
| Special events (concerts, festivals, major sports) | 6–12 months | Accommodation near event sells out extremely fast |
| Last-minute (<2 weeks out) | As soon as possible | Act immediately; each day reduces options and raises prices |
The general principle: the more popular the destination, the more popular the season, and the more specific your requirements—particular hotel, specific activity that requires a booking, special event attendance—the earlier you need to start. Building the habit of planning travel further in advance is one of the highest-return improvements a frequent traveler can make.
Step 1: Define Your Budget and Dates
Most people pick a destination first and then realize they can’t afford it. Flip the script. Determine your financial runway first to filter your options realistically.
The Financial Reality Check
Before you look at a map, look at your bank account. Use the principles from our zero-based budget checklist to create a dedicated “Travel Fund.”
- Set a Cap: Decide the total amount you are willing to spend.
- The “Daily Burn”: Divide your total budget by the number of days you want to travel. This is your daily spending limit.
- Dates: Are your dates flexible? Traveling during the “shoulder season” (May/September) can save you 30-50% compared to peak summer months.
Building a Realistic Travel Budget: The Full Cost Breakdown
Most travelers dramatically underestimate their total trip cost because they calculate only the headline expenses—flights and accommodation—and ignore the dozens of smaller costs that collectively add 30–50% to the final total. A complete budget accounts for every category before a single booking is made.
The full cost structure of any trip breaks down as follows: flights (typically 25–40% of total cost), accommodation (25–35%), food and drink (15–25%), activities and entrance fees (8–15%), local transportation (5–10%), and a miscellaneous buffer of at least 10% for unexpected costs, price increases, and the inevitable impulse purchases that make travel enjoyable. Building that miscellaneous buffer into the initial budget—rather than treating it as a budget failure if used—is what separates realistic planners from those who return home stressed about overspending.
For destination-specific budgeting, researching average daily costs on platforms like Budget Your Trip, Numbeo, or travel blogs specific to your destination provides real-world data on what food, transport, and accommodation actually costs—not what the tourist industry claims they cost. A difference of $20 per day per person over a two-week trip is $280, which can fund an extra two nights of accommodation or a memorable splurge experience.
The Travel Fund Strategy: Saving Without Feeling It
The most effective savings strategy for travel is automation. Setting up an automatic transfer on payday—even $50–$100 per month—into a dedicated travel savings account removes the willpower requirement entirely. The money is never in your spending account, so it cannot be spent. Over six months, even $75 per month produces $450, enough to cover flights to budget-friendly European destinations from many US cities during off-peak season.
Rounding up savings apps—which round each purchase to the nearest dollar and transfer the difference to savings—add an effortless supplementary stream. Combined with a deliberate savings sprint in the two to three months before a trip (reducing discretionary spending, canceling unused subscriptions, redirecting entertainment budgets), most people can save meaningfully more than they expect without feeling deprived.
Step 2: Choose Your Destination (Strategically)
Now that you have a budget, you can choose a destination that fits it.
Matching Budget to Location
If your budget is tight, avoid London or Zurich. Instead, look for high-value destinations where your currency goes further.
- Value Destinations: Check our guide on the top 5 cheapest European cities to visit right now for inspiration on affordable luxury.
- Research Phase: Use a reliable machine, like one of the top 10 budget laptops, to open multiple tabs and compare flight prices using tools like Google Flights or Skyscanner.
The Destination Research Framework
Once you have a budget range and a rough trip duration, destination selection becomes a matching exercise rather than an inspiration lottery. Start by identifying the geographic zone that your flight budget can reach—there is a meaningful difference between a $400 flight budget and an $800 one in terms of accessible continents and regions. Within that zone, filter by climate (do you want hot, cool, or temperate weather during your travel window?), activity type (cities, nature, beaches, mountains), and travel infrastructure (how easy and affordable is it to get around once you arrive?).
The concept of value alignment is worth applying deliberately. A food-focused traveler will find significantly more satisfaction in a destination known for diverse, cheap, high-quality street food than in a visually stunning but gastronomically limited location. A history enthusiast will find more return in a city with dense archaeological and museum offerings than a beach resort. Mapping your personal travel priorities—what genuinely makes a trip memorable for you—to destination characteristics produces better trips than following trend-driven “must-see” lists.
Visa and Entry Requirements: The Step Most People Skip
Visa requirements are the first non-negotiable filter for any destination shortlist. Many travelers operate on the assumption that their passport provides visa-free access everywhere, which is only true for a small number of the world’s most powerful passports—and even then, with significant exceptions. Always check the entry requirements for your specific passport nationality, not just the general tourist visa policy for a destination.
For US passport holders, the vast majority of Western European, most of Southeast Asian, and many Latin American destinations offer visa-free entry for stays under 90 days. However, tourist visas for countries like Russia, China, India, and several Central Asian nations require advance application with significant lead time—sometimes four to six weeks minimum. Discovering a visa requirement after booking a flight is an expensive and stressful situation that a 10-minute check prevents entirely.
Electronic Travel Authorizations (ETAs)—which are not visas but pre-approval registrations required by countries including Canada, the UK, Australia, and several others—are frequently confused with visa-free access. They are quick and inexpensive to obtain online, but they must be secured before boarding. Check the specific entry requirements for your passport at the destination government’s official immigration website, not a third-party aggregator, for the most accurate current information.
Step 3: Book the “Big Two” (Flights and Sleep)
These are your biggest expenses. Booking them early locks in your commitment and structure.
The Booking Strategy
Don’t use a debit card for this. Use a card that offers protection and rewards.
- Leverage Points: If you have one of the best 5 travel rewards credit cards, check if you can transfer points to airlines for a free flight.
- Accommodation Type: Decide between a hotel (convenience) or an Airbnb (kitchen access). If you choose an Airbnb, you can save money by cooking quick and healthy dinners yourself.
- Digital Organization: As confirmation emails roll in, use an app from our productivity apps list (like TripIt or Wanderlog) to organize them automatically.
Flight Booking: Advanced Techniques for Getting the Best Price
The folklore around flight booking—”book on Tuesday,” “book exactly 47 days in advance,” “use incognito mode”—is largely myth. What does consistently produce better prices is a combination of flexibility, patience, and using the right tools. Google Flights’ price tracking feature sends email alerts when prices drop on a specific route, removing the need to manually check prices daily. Setting an alert the moment you confirm your destination and travel window, then waiting for a price that fits your budget, is a more reliable strategy than any specific booking day or browser mode.
The most underused Google Flights feature for budget travelers is the Explore map view, which shows color-coded flight prices from your departure city to destinations across an entire continent or the world. Rather than searching for a specific city, you enter your departure airport, select a travel month, and see instantly which destinations are cheapest. This approach—destination-agnostic price discovery—often surfaces options that would never appear in a traditional destination-first search.
For multi-city trips, building your own open-jaw routing (flying into one city and out of another) rather than booking round trips from a single hub is frequently cheaper. Booking each leg separately from different carriers via budget airlines within the destination region can reduce inter-city travel costs dramatically compared to any single-carrier round trip.
Accommodation: Beyond Hotels vs. Airbnb
The accommodation decision is more nuanced than a binary hotel-versus-apartment choice. Each accommodation format has specific conditions under which it represents the best value—and getting this right for your specific trip meaningfully affects both budget and experience.
Hotels make the most sense for single-night stays, business trips where expense reporting is required, and destinations where you are rarely in the room and the hotel’s location, security, and daily housekeeping justify the premium. Airbnb and apartment rentals earn their value on stays of four or more nights in the same location, where the kitchen access, additional space, and often lower per-night cost compared to equivalent hotels compound meaningfully. Hostels—even private rooms in well-rated hostels—offer the lowest prices in most cities and include social infrastructure (common areas, organized activities, local knowledge) that hotels and apartments cannot match.
A hybrid accommodation strategy across a multi-city trip—a well-located apartment in the city where you are staying longest, a central hotel for a one-night transit stop—is often the optimal approach for both cost and experience.
Step 4: Build Your Loose Itinerary
Over-planning ruins trips; under-planning wastes them. The goal is a flexible framework.
The “One Big Thing” Rule
Don’t try to do everything. Plan one major activity per day and leave the rest open for exploration.
- Block Your Time: Use time blocking techniques to group activities by neighborhood. Don’t cross the city three times in one day.
- Rest Days: If your trip is longer than a week, schedule a “do nothing” day. You can use this time to catch up on reading the top finance books or simply relax in a cafe.
The Neighborhood Clustering Method
The most common itinerary mistake is building a daily schedule that looks logical on a list but ignores geography. Visiting the city’s northern museum in the morning, its southern market at lunch, a western viewpoint in the afternoon, and an eastern neighborhood restaurant in the evening may seem like an efficient use of time—but the transit time between these points consumes hours that could have been spent experiencing each location more deeply.
The neighborhood clustering method treats each day as a geographic unit. Before building your schedule, mark all of your “want to see” attractions on the destination’s map and identify natural geographic clusters. Each day covers one cluster—typically a walkable area of one to three neighborhoods—with enough flexibility to explore streets, cafés, and shops that were not on the original list. This approach produces both greater efficiency and greater serendipity: you move less and discover more.
Most cities have a natural geographic logic that experienced locals follow: the historic core, the market district, the arts and independent restaurant neighborhood, the upmarket shopping area, the viewpoint hill or waterfront promenade. Mapping your attractions to these zones and assigning one zone per half-day produces a framework that is both efficient and immersive.
Booking Attractions: What to Pre-Book and What to Leave Open
Not everything needs to be pre-booked, and pre-booking everything produces a rigidity that is antithetical to good travel. The correct principle is to pre-book only the activities where failure to book in advance results in not being able to do the activity at all—not just mild inconvenience.
Experiences that consistently require advance booking: major landmark tours with timed-entry tickets (the Colosseum, Alhambra, popular museums), cooking classes or food tours with limited group sizes, popular day trips with specific departure times, evening performances and concerts, and any restaurant you specifically want to eat at for a special meal. These are bookings where the cost of missing out is high and the cost of booking is low.
Everything else—cafés, general city exploration, spontaneous restaurant choices, neighborhood wandering, most museums that do not require timed entry—should be left open. The best travel memories almost always involve unplanned encounters, stumbled-upon discoveries, and conversations with locals that no itinerary could have scheduled.
Step 5: Documents, Health & Insurance
This is the unsexy step that saves you from disaster.
The Safety Audit
- Passport Check: Ensure it has at least 6 months of validity left.
- Digital Backups: Scan your passport and ID. Store them securely using one of the 5 free password managers so you can access them even if your phone is stolen.
- Self-Care: Travel is exhausting. Plan your health strategy using the ultimate self-care checklist. Do you have your prescriptions? Do you need travel insurance?
Travel Insurance: What It Actually Covers and Why It Matters
Travel insurance is the category where budget travelers most commonly make a costly mistake: skipping it to save $50–$100, then facing a $10,000 medical bill or a $2,000 trip cancellation loss that the insurance would have covered entirely. Understanding what travel insurance actually covers—and what it does not—removes the “I’ll be fine” gamble from your planning.
A comprehensive travel insurance policy typically covers: trip cancellation and interruption (reimbursement if you must cancel for a covered reason), medical expenses abroad (critical if your domestic health insurance provides limited or no international coverage, as most US plans do), emergency medical evacuation (the most expensive single event travel insurance can cover, with helicopter evacuations from remote areas regularly costing $50,000–$200,000), baggage loss and delay, and travel delay expenses. Some policies also cover adventure activities like skiing, hiking, or diving that standard policies exclude.
The most important question to answer when choosing a policy is whether your existing health insurance covers international medical expenses. Most US employer-sponsored health plans provide zero or severely limited international coverage. Medicare provides no international coverage at all. If your domestic insurance does not cover international emergencies, a policy with robust medical coverage is not optional—it is essential risk management.
Health Preparation: Vaccinations and Pre-Travel Medical Visits
For international travel to certain destinations, vaccination requirements or recommendations exist that most travelers are unaware of until the week before departure—at which point some vaccines are too late to administer fully. The CDC’s travel health website allows you to enter your destination and receive a customized list of recommended and required vaccinations and health precautions.
Destinations in sub-Saharan Africa, South and Southeast Asia, and parts of Central and South America may require yellow fever vaccination certificates for entry, and may recommend malaria prophylaxis, typhoid vaccines, and hepatitis A and B immunization. Most of these are standard vaccines available from any travel medicine clinic, but they require three to eight weeks of lead time for full efficacy. Addressing this step early in the planning process—not the week before departure—ensures you are protected.
For travelers with existing medical conditions or regular prescriptions, a pre-travel medical visit is advisable to review medication supplies (ensure you have enough for the full trip plus a buffer), confirm fitness to fly on longer routes, and address destination-specific concerns. Documenting prescriptions in their original labeled containers and carrying a translated prescription letter in the destination language prevents customs complications with medications that may be controlled substances in some countries.
Step 6: Pack Like a Pro (Carry-On Only)
Checked bags are a liability. They get lost, they cost money, and they slow you down. Master the art of the carry-on.
The Minimalist Approach
You need less than you think.
- The List: Do not guess. Follow our ultimate packing list for a 10-day trip.
- Essentials: Ensure you have the 8 essential items in your carry-on (chargers, meds, change of clothes) in case you are forced to gate-check your bag.
- Skincare: Decant your products. Stick to the essential 4-step routine to save space without sacrificing your skin health.
The Packing Psychology: How to Decide What to Leave Behind
The reason most people overpack is an anticipatory anxiety called “what if” thinking. What if it rains? What if there is a formal dinner? What if I need a third pair of shoes? Each “what if” scenario adds items to the bag until the bag is full and the traveler has, statistically, worn less than 60% of what they packed.
The solution is to interrogate each “what if” item with a cost-benefit analysis. Ask: how likely is this scenario, and if it occurs, what is the actual cost of not having this item? For most “just in case” items, the scenario probability is low (less than 20%) and the cost of not having the item is manageable (buying an inexpensive umbrella locally, borrowing from the hotel, wearing what you have). The item fails its own cost-benefit test and should be removed.
The “wear it before you pack it” test is useful for clothing specifically: if you would not wear a clothing item on a normal weekend at home, you will almost certainly not wear it on a trip. Travel clothes need to earn their weight through versatility—the ability to be worn in multiple contexts, climates, and combinations—not through theoretical completeness.
Packing Organization: The System That Prevents Mid-Trip Chaos
A packed bag without an organizational system is a bag you dread opening. Packing cubes—zippered fabric containers that divide your bag into categories—are the foundational tool of organized carry-on travel. Assign each cube a specific category: one for tops, one for bottoms, one for underwear and socks, one for tech and cables. Every item has a home, every item is findable in under 30 seconds, and repacking after a night in a hotel takes two minutes rather than fifteen.
The ranger roll clothing technique—tightly rolling garments before placing them in cubes rather than folding flat—reduces clothing volume by 20–30% and significantly decreases wrinkles compared to folding. Combined with compression cubes that have a secondary zip to expel air, this technique allows experienced travelers to fit a surprisingly complete wardrobe into airline-compliant carry-on dimensions.
Step 7: The 24-Hour Countdown
The day before you leave is for securing your home and your mind.
The Departure Protocol
- Home Prep: Unplug electronics (like your custom PC build or kitchen gadgets) to save energy.
- Phone Prep: Change your settings to avoid roaming charges. Consult our guide on 7 smartphone settings you need to change immediately.
- Morning Routine: Plan your travel morning using our morning routine checklists to ensure you leave the house calm, fed, and on time.
The 24-Hour Countdown: A Complete Pre-Departure Protocol
The 24 hours before departure contains more potential for stress than any other period of the trip. Missed tasks, forgotten items, and logistical surprises cluster in this window. Working through the following protocol the evening before departure eliminates the most common sources of departure-day anxiety.
Evening before (T-12 hours): Complete your final pack, weigh the bag against airline limits, charge all devices to 100%, download offline content (maps, music, shows, work documents), complete online check-in and save boarding passes to your phone’s wallet app, set two alarms for departure morning, and prepare your departure-day outfit including any items—belt, watch, shoes—that need to come off at security so they are in an accessible outer pocket rather than buried in your bag.
Morning of (T-3 to T-4 hours before flight): Confirm your transport to the airport and departure time. For flights, the general rule is T-2 hours for domestic and T-3 hours for international to account for check-in, security, and any unexpected queues. Eat a real meal before leaving—airport food is expensive and often insufficient—and bring snacks for the transit period regardless. Do a final walkthrough of your home: lights off, appliances unplugged, windows locked, any food that will spoil disposed of or refrigerated.
Home Security and Logistics While You Are Away
Preparing your home for your absence is a category that most travelers address only partially or ignore entirely until a problem occurs. A complete home-departure checklist takes 30 minutes and prevents the mid-trip anxiety of wondering whether you left the oven on, whether your plants are dead, or whether your neighbor has your emergency key.
For trips longer than a week, arrange for mail collection or suspension (a pile of mail in the letterbox signals an empty home to opportunistic thieves), arrange for plant care if you have plants that require regular watering, set smart plug timers on interior lights to simulate occupancy if your home will be empty for an extended period, and ensure a trusted neighbor or friend has your contact details and knows you are away. Turning down or off your water heater reduces energy costs for the duration of your absence.
Notify your bank and any credit card issuers of your travel dates and destination countries. Modern fraud detection systems flag unusual international transactions, and a frozen card abroad—especially outside banking hours—is one of the most disruptive financial events that can happen during travel. A two-minute call or online notification prevents this entirely.
Planning for Different Travel Styles: Solo, Couple, Group, and Family
The seven-step system applies universally, but the specific execution varies meaningfully depending on the composition of your travel party. Each configuration has distinct planning challenges and opportunities that are worth addressing specifically.
Solo Travel: The Highest-Control, Highest-Flexibility Option
Solo travel eliminates the primary source of travel friction: misaligned preferences. When you travel alone, every decision—where to eat, how long to spend in a museum, whether to take a detour—is made instantly and without negotiation. This efficiency compounds across a trip into a fundamentally different experience than group travel.
The primary planning consideration for solo travelers is accommodation selection. Hostels with shared dormitories are the most cost-efficient option and have the added benefit of built-in social opportunities—it is significantly harder to feel isolated in a hostel with a shared common area than in a private hotel room. Solo travelers who value their own space should look for boutique hotels with strong common areas, or Airbnbs in central locations that allow natural integration with neighborhood life.
Solo travelers should always share their itinerary with a trusted contact at home who knows when to expect check-ins. This is not paranoia—it is the standard safety practice recommended by every travel organization and travel insurance provider.
Couple and Group Travel: Managing Shared Decision-Making
The most common tension in couple and group travel is mismatched expectations that were never explicitly discussed before departure. One person wants structured sightseeing; the other wants to wander aimlessly. One person has a tight budget; another is comfortable spending freely. These mismatches do not appear as planning failures in the moment—they appear as arguments at 2pm on day three.
The solution is explicit pre-trip alignment on three questions: What are we each hoping to get from this trip? What is the daily spending level we are both comfortable with? What are the one or two things each of us absolutely wants to do, and what can we live without? Answering these questions before a single booking is made—not after—determines whether a trip strengthens or strains a relationship.
For larger groups, a shared planning document (a Google Doc or collaborative travel app) prevents the information asymmetry where one person holds all logistics in their head and becomes the group’s de facto travel coordinator regardless of whether they wanted that role. Every booking confirmation, every address, every backup plan should be in a document everyone can access.
Family Travel: Planning for the Most Variables
Traveling with children introduces variables that make the planning process more complex and the benefit of thorough preparation more valuable. Children’s energy levels, dietary requirements, nap schedules, and tolerance for extended sightseeing differ dramatically from adults’ and from each other’s. Planning a family trip with the same activity density as a couple’s trip is a reliable recipe for exhausted, fractious days.
The “one big thing per day” rule, already mentioned in Step 4, is more important for family travel than any other configuration. One structured activity—a museum, a boat trip, an amusement park—with generous unstructured time before and after is a more successful day than four attractions crammed into a schedule that requires constant movement. Children’s best travel experiences are often the simplest: a playground in a foreign city, ice cream from a street vendor, a ferry ride with a good view. These moments require no planning—they require spaciousness in the schedule.
The Best Digital Tools for Modern Trip Planning
Trip planning has been transformed by a generation of applications that were specifically designed to solve the organizational challenges travelers face. Using the right tools for each planning phase reduces time investment, prevents missed bookings, and keeps all trip information accessible in a single coherent system.
Flight Tracking and Booking
Google Flights remains the gold standard for flight search due to its flexibility features—the calendar price view, the Explore map, and the price tracking alerts. Skyscanner adds value for budget airline searches and flexible destination discovery. Hopper uses historical pricing data to predict whether prices will rise or fall and recommends whether to book now or wait—a genuinely useful AI application for a domain where timing matters.
Accommodation Platforms
Booking.com offers the widest global inventory and genuinely flexible cancellation policies on most properties—a significant practical advantage for travelers whose plans may change. Airbnb is strongest for apartment-style accommodation in city destinations. Hostelworld remains the definitive hostel-specific platform with detailed review systems that accurately represent the atmosphere and community quality of individual properties—information that general booking platforms rarely capture.
Itinerary Organization
TripIt automatically parses booking confirmation emails and builds a master itinerary, eliminating the need to manually enter reservation details. Wanderlog combines itinerary building with collaborative editing, mapping, and budget tracking in a single interface designed specifically for travel planning rather than adapted from a general productivity tool. Google Maps’ “Saved” lists function as an unofficial travel planning tool—saving restaurants, attractions, and neighborhoods to named lists before a trip creates a personal, always-accessible reference guide.
On-the-Ground Navigation and Translation
Google Maps with offline area downloads is non-negotiable for international travel—it works without a data connection and provides walking, transit, and driving directions across virtually every destination on earth. Google Translate’s camera function translates menus, signs, and documents in real time using your phone camera, and offline language packs provide translation capability without a data connection. Citymapper is superior to Google Maps for public transit navigation in major cities, with more accurate real-time service updates and multi-modal journey planning.
When Things Go Wrong: The Emergency Playbook
The most experienced travelers are not those who have perfect trips—they are those who handle imperfect trips well. Flight cancellations, missed connections, stolen wallets, medical emergencies, and natural disruptions happen to even the most meticulously prepared travelers. Having a mental model for how to respond prevents panic and accelerates resolution.
Flight Disruptions
A cancelled or significantly delayed flight triggers specific passenger rights depending on your departure country and airline. In the EU, EC 261/2004 provides strong passenger protections—for flights delayed over three hours or cancelled without sufficient notice, passengers are entitled to compensation of €250–€600 depending on route distance, plus meals and accommodation if the delay requires an overnight stay. US protections are more limited but still require airlines to rebook passengers on the next available flight and provide compensation for delays attributable to the airline.
The practical first step when a flight is disrupted: contact the airline immediately via their app or phone (not the airport queue, which moves slowly). Social media direct messages to airline accounts often receive faster responses than phone queues during major disruptions. If you miss a connection due to the airline’s delay, the airline is responsible for rebooking you regardless of whether the tickets were on the same or separate bookings—though separate booking disruptions are handled differently and more slowly.
Lost or Stolen Valuables
A stolen wallet or phone initiates a specific sequence of actions that, when done in the right order, minimizes financial and logistical damage. First: remotely lock and locate (or erase) your phone via Find My Device or Find My iPhone before the thief can access any accounts. Second: immediately block all payment cards via your bank’s app or 24-hour emergency line. Third: file a police report—even if recovery is unlikely, the report number is required for insurance claims and sometimes for emergency travel document replacement. Fourth: contact your travel insurance provider to initiate a claim and receive emergency support.
The best preparation for this scenario is the document backup system described in Step 5. With digital copies of your passport, payment card numbers, and insurance policy accessible from any device, the recovery process begins from a position of information rather than helplessness.
Essential Gear for Smooth Travel
The right gear turns a chaotic trip into a smooth operation. These tools are investments in your peace of mind.

If you are committing to the carry-on life (Step 6), you need a bag that maximizes every inch of overhead bin space. The Samsonite Freeform is ultra-lightweight (under 6.5 lbs), durable, and has 360-degree spinner wheels that glide through airports. It fits perfectly with the highly effective habit of being agile and efficient.
Check Price on Amazon
Packing cubes are not optional; they are mandatory for organization. Eagle Creek’s “Isolate” cubes are translucent (so you see what’s inside) and contain odors (perfect for laundry). They compress your clothes, allowing you to fit 30% more into your bag—a crucial hack for executing the 10-day packing list.
Check Price on Amazon
While digital apps are great, a physical planner helps visualize your trip during Step 4 (Itinerary Building). This journal has sections for budget tracking, packing lists, and daily itineraries. It keeps you accountable to your budget, helping you build the financial habits that make future travel possible.
Check Price on AmazonThe Complete 7-Step Trip Planning Master Checklist
Use this checklist as your single reference document from the first moment of inspiration to the minute you board. Each item maps to a step in the guide above.
📋 Step 1: Budget & Dates
- Set total trip budget and daily spending limit
- Identify flexible date windows (shoulder season preferred)
- Open dedicated travel savings account and automate contributions
- Confirm no existing debt that travel would worsen
🗺 Step 2: Destination
- Match destination options to budget range
- Check visa and entry requirements for your passport
- Check climate and seasonal conditions for travel window
- Confirm no travel advisories for destination
✈ Step 3: Flights & Accommodation
- Set Google Flights price alert for target route
- Check travel rewards card points for potential redemptions
- Book flights (use travel card for purchase protection)
- Book accommodation for all nights (flexible cancellation where possible)
- Organize all confirmations in TripIt or similar app
📅 Step 4: Itinerary
- Map all “want to see” attractions geographically
- Create daily neighborhood clusters
- Book all timed-entry or limited-availability experiences in advance
- Schedule at least one rest/free day per week
- Download offline Google Maps for destination city/region
📄 Step 5: Documents & Health
- Confirm passport valid for 6+ months beyond travel date
- Apply for visa or ETA if required
- Check CDC destination health page for vaccinations/precautions
- Purchase travel insurance (medical, cancellation, evacuation)
- Scan passport and all cards; store in secure cloud folder
- Notify bank and credit card issuers of travel dates
- Ensure adequate prescription medication supply + buffer
🧳 Step 6: Packing
- Follow destination-appropriate packing list (carry-on dimensions)
- Decant toiletries; consider solid alternatives
- Pack one full change of clothes accessible in carry-on
- Charge all devices; pack all cables and adapter
- Download offline entertainment (shows, music, podcasts)
- Weigh final bag against airline allowance
🏠 Step 7: 24-Hour Countdown
- Complete online check-in; save boarding passes to phone wallet
- Arrange mail collection and plant care if applicable
- Unplug non-essential appliances
- Set smart plug timers if home will be empty
- Share itinerary with trusted contact at home
- Confirm airport transport and travel time with buffer
- Set two departure alarms
Final Verdict: Plan the Work, Work the Plan
Planning a trip doesn’t have to be a source of anxiety. By following this checklist, you front-load the hard work. You handle the budget, the logistics, and the packing strategies now, so that when you land, you are free to be present.
Start with Step 1 today. Open your calendar, open your budget app, and make the decision. The world is waiting.